If you’re looking for a fast and easy dessert that fits the bill for something tasty… here you go!
Individual Raspberry Cream Pies come together in a snap and taste like you’ve actually slaved away to make them!
(For those of you who do everything from scratch, cover your eyes and come back next week…)
Ingredients

Unfold pie dough then using a circle cutter/sealer to mark circles on the dough. Do not cut into the dough, just outline circles.

Spread about a teaspoon of cream cheese inside each circle, trying not to get too close to the edges.
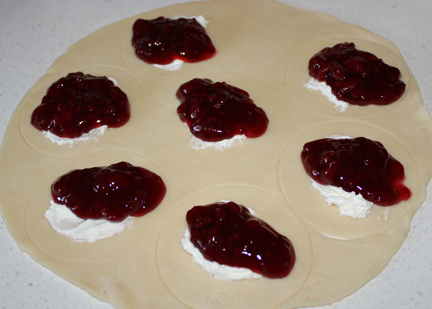
Add a heaping tablespoon of raspberry pie filling. Keep it away from the edges as best you can.

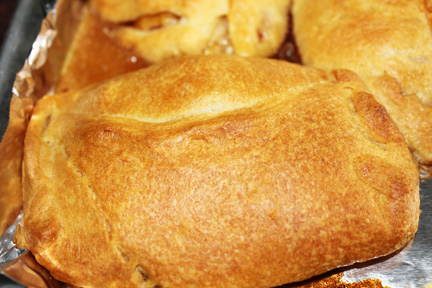
Cover with the top crust and using the mounds below, cut using the cutter. If you don’t have one of these handy little cutters that seal the edges, just use a drinking glass to cut out and then crimp the edges with a fork or your fingers.

Aren’t they fun?

Transfer to a baking sheet. I lined mine with foil because I’m lazy and don’t want to scrub off any raspberry juice that may perhaps leak out.

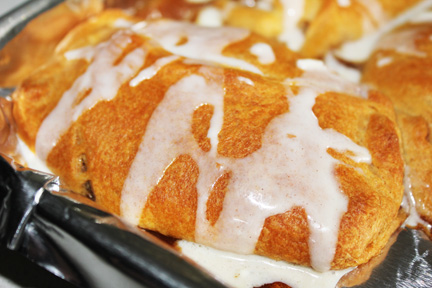
Top with a little sprinkle of Turbinado sugar.
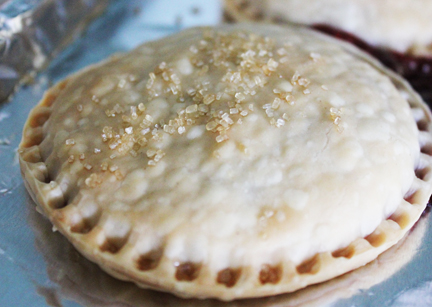
Bake about 15-20 minutes until crust begins to brown and, if you have a few unsealed edges (not that I ever have that problem), juice bubbles out.

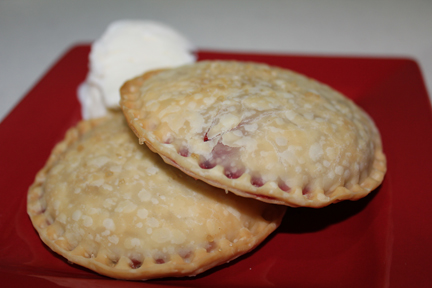
Serve with a scoop of ice cream. You might even think about sharing with others you really, really like.
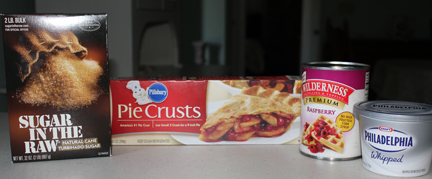
Raspberry Cream Pies
1 can raspberry pie filling
1 box pie dough
1 container spreadable cream cheese
Turbinado sugar (Sugar in The Raw)
Preheat oven to 350 degrees.
Line a baking sheet with foil or parchment.
Bring pie dough to room temp and then unroll. Set aside one layer.
On the first layer, carefully mark circles, fitting in as many as you can. I managed to get eight and then rerolled the dough to get two more. Do not cut through the dough, you are just marking circles by lighting pressing either a cutter or drinking glass into the dough.
Spread a teaspoon of whipped cream in each circle, staying away from the edges. You can use any type of spreadable cream cheese, I just happened to have whipped handy.
Spread a heaping tablespoon of pie filling on top of the circles, again keeping filling away from the very edge. (You will have leftover filling, which is easy to freeze to top pancakes, scoop into muffin mix, spread on fruit pizza, or pour over ice cream.)
Place top layer of crust over the top. Using the mounds beneath as your guide, cut out the individual pies. If you don’t have a cutter that cuts and seals the edges, use a drinking glass and then crimp the edges with a fork or your fingers. The reason for keeping the filling away from the edge is that if it is too close it leaks out everywhere when you are trying to seal it. Make sure your dough is sealed or be sure to line your baking pan (hence the reason I line mine because I always have a sneaky leak!)
Place on your baking sheet then sprinkle the tops with Turbinado sugar. Just a pinch will do.
Bake approximately 15-20 minutes until lightly browned and juices are bubbling (which is easy to tell if one of them isn’t properly sealed).
Let cool then serve with a scoop of vanilla ice cream. The ice cream is essential. My Dad made it a rule long ago that all pie should be served with ice cream. Who am I to argue!
She Who Likes Little Pies (and Big Pies and In-Between Pies)